How to Set Up Your Dashcam
Posted on August 24, 2026 By Mike M.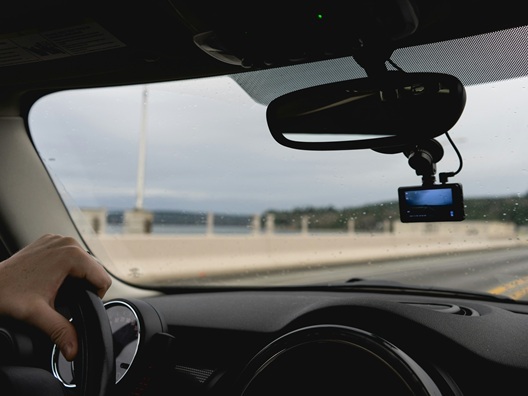
Installing a dashboard camera is one of the smartest upgrades you can make for your vehicle. A high-quality dashcam can automatically capture your daily commutes, scenic road trips, and unexpected moments behind the wheel. Setting up your new device doesn't require advanced mechanical skills, either. With a few strategic adjustments, you can get your dashcam up and running in no time at all!
In this guide, we will cover:
- Finding the safest and most effective mounting positions on your glass.
- Understanding basic plug-and-play methods to get your camera running.
- Navigating critical software settings like loop recording and G-sensors.
- Selecting and maintaining the right memory card for continuous recording.
Where to Place Your Dashcam
Proper camera placement is essential for capturing a clear, panoramic view of your surroundings while ensuring your dashboard setup remains completely unobstructed.
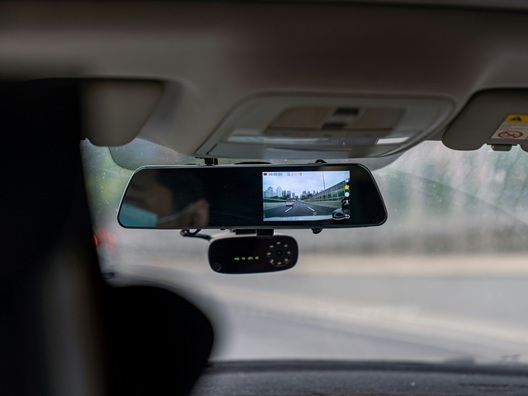
- Front Windshield Placement: The ideal spot for your front-facing camera is directly behind or just below your rearview mirror. Centering the device here ensures an even, wide-angle view of the entire road ahead while keeping the unit completely out of your direct line of sight while driving.
- Rear Window Placement: If you are installing a dual-channel system, mount the secondary rear camera at the top center of your back windshield. If you have rear wiper blades, be sure to place it within the wiping path so it can clearly capture footage during heavy rain or snow.
- Avoiding Obstructions: Before pressing the adhesive or suction cup mount onto the glass on the front, double-check that the lens isn't blocked by the rearview mirror housing, dark window tint strips, or the black ceramic dots printed on your windshield.
Mounting locations and windshield visibility requirements may vary depending on your state or local regulations. Always follow windshield placement and audio recording requirements and applicable state, federal and local laws, as well as your vehicle manufacturer's recommendations when installing accessories. Ensure when installing your Dashcam that your vehicle is safely parked and turned off in accordance with the manufacturer’s instructions.
How to Install Your Dashcam
Mounting your camera and routing the power source requires a few methodical steps to ensure a clean interior look and reliable operation.
- Mounting the Hardware: Before pressing down the suction cup or adhesive mount, clean your windshield thoroughly according to the dashcam manufacturer’s instructions. Secure the camera body into the mount bracket and adjust the lens angle so the horizon sits near the center of your live-view screen.
- The Plug-and-Play Power Supply: For a quick setup, plug the provided power adapter into your vehicle’s 12V outlet or an open USB port. On most models, the camera will automatically power up when you twist your key in the ignition and turn off when the engine stops.
- Planning Your Cable Path: Because every car layout, dashboard design, and electrical setup is unique, installation methods will differ significantly depending on the vehicle you drive. When figuring out how to manage the power cable, it is vital to consult both your dashcam user guide and your vehicle owner’s manual to ensure the wire does not cross, block, or interfere with any vehicle safety systems.
- Optional Hardwire Kits: For drivers who want to unlock advanced features like 24-hour parking monitoring, a specialized hardwire kit can connect the camera directly to the vehicle's electrical system to provide continuous power. Because this method requires interacting with your vehicle's electrical infrastructure, professional installation is highly recommended to ensure it is integrated safely.
- Storage Preparation: Drop a microSD card into the slot before turning the unit on. Access the digital setup menu on the screen and select "Format" to ensure the storage system is clean and fully synced with the camera's file processor.
If you’d rather skip the hassle altogether, many retailers like P.C. Richard & Son will install your dashcam for you, backed by a standing warranty on the installation itself (covering issues like the unit falling off the window, exposed wiring, or power problems related to the installation).
Features to Look for in a Dashcam, and How to Use Them
Modern dashboard cameras come packed with intelligent software designed to automate video capture and protect your most important files from being deleted.
- Loop Recording: This foundational setting instructs the camera to record video in continuous bite-sized clips, usually one to five minutes in length. When the microSD card runs out of space, the software tends to automatically overwrite the oldest unlocked footage. This ensures you’ll never run out of storage mid-drive, and you’re not erasing any newer footage that might be more relevant to you.
- G-Sensor Calibration: A G-sensor is the device built into your dashcam that detects sudden changes in motion like structural impacts, hard braking, or bumps. When triggered, the G-sensor automatically locks the current video file, preventing the loop recording feature from accidentally overwriting that specific clip in case you need it for any reason.
- Parking Mode Functionality: This advanced feature monitors your vehicle while it is parked and turned off, automatically waking up the camera to record a clip if it detects motion around the car or a physical impact. Please note that utilizing parking mode typically requires hardwiring the camera directly to your car's fuse box for continuous power.
- Built-In GPS Logging: Opting for a model with internal GPS tracking allows the camera to embed your exact driving speed and geographical coordinates directly onto the video file. This provides a record of your vehicle’s location and speed data, subject to the capabilities and accuracy of the device.
- Interior-Facing Camera: Sometimes it’s just as important to record inside the car as it is to record the road around it. That’s why some models come with an inward-facing camera, so you can see yourself driving along with simultaneous footage of the road. This can be exceptionally helpful to see what was going on in the cabin at the time of an accident, or as a digital record of your job if you drive for a rideshare service.
Setting up your dashcam can be a quick afternoon project that offers massive long-term benefits for tracking your drives. By taking the time to position the lens correctly on either side of your car, routing the power cables neatly out of sight, and activating automated features, you ensure that your vehicle is fully prepared to document every mile. Mount your camera, and hit the road today!
Disclaimer: This article provides general information only. Installation procedures, product features, and legal requirements vary by vehicle, dashcam model, and jurisdiction. Always follow and rely upon the instructions provided by your dashcam manufacturer. Improper installation may damage a vehicle electrical system or interfere with vehicle safety features. If you are unsure about any aspect of installation, please consult a qualified P.C. Richard & Son installer by visiting your nearest showroom or calling 1-877-727-1909.